
Treat your tastebuds with this tasty Roasted Red Pepper Hummus. It is full of healthy goodness and smooth, creamy chickpeas!
About This Roasted Red Pepper Hummus
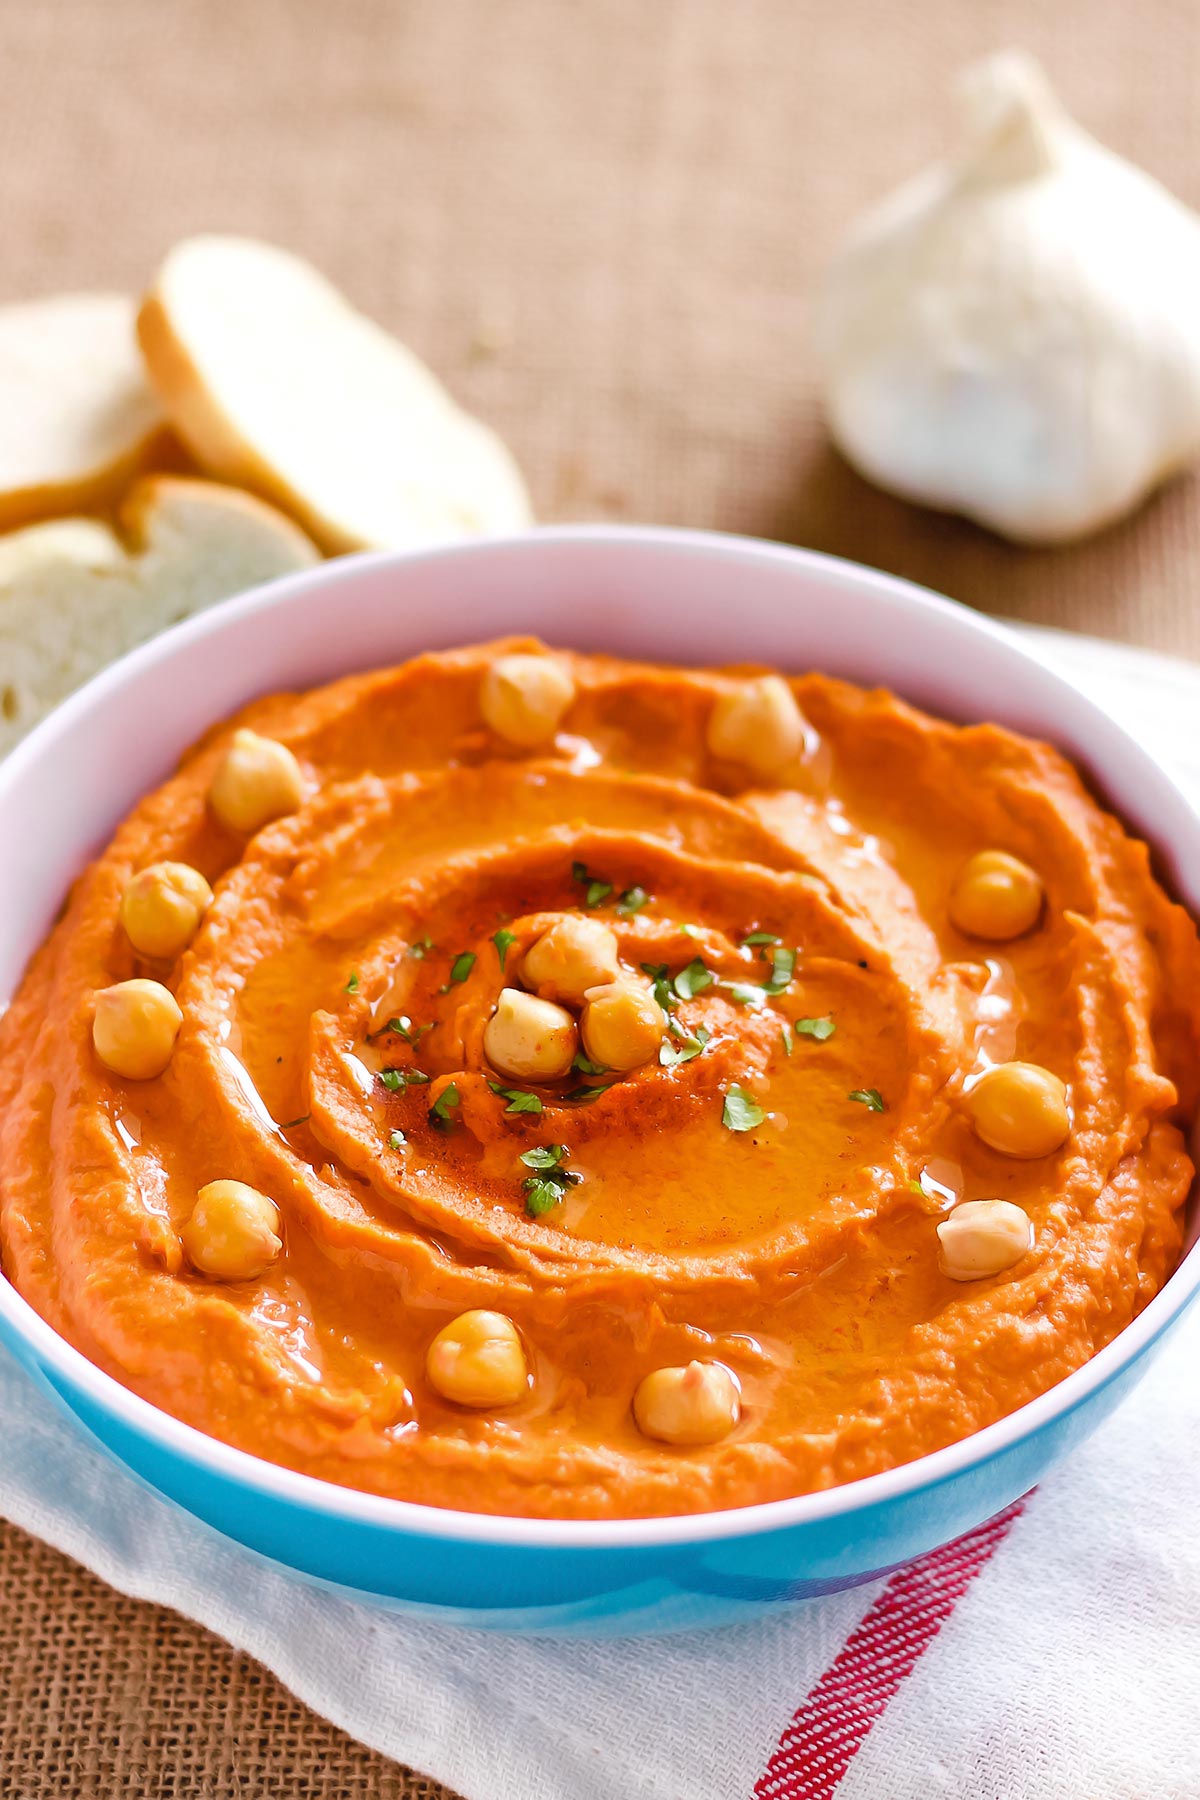
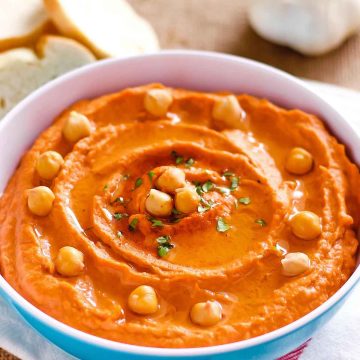
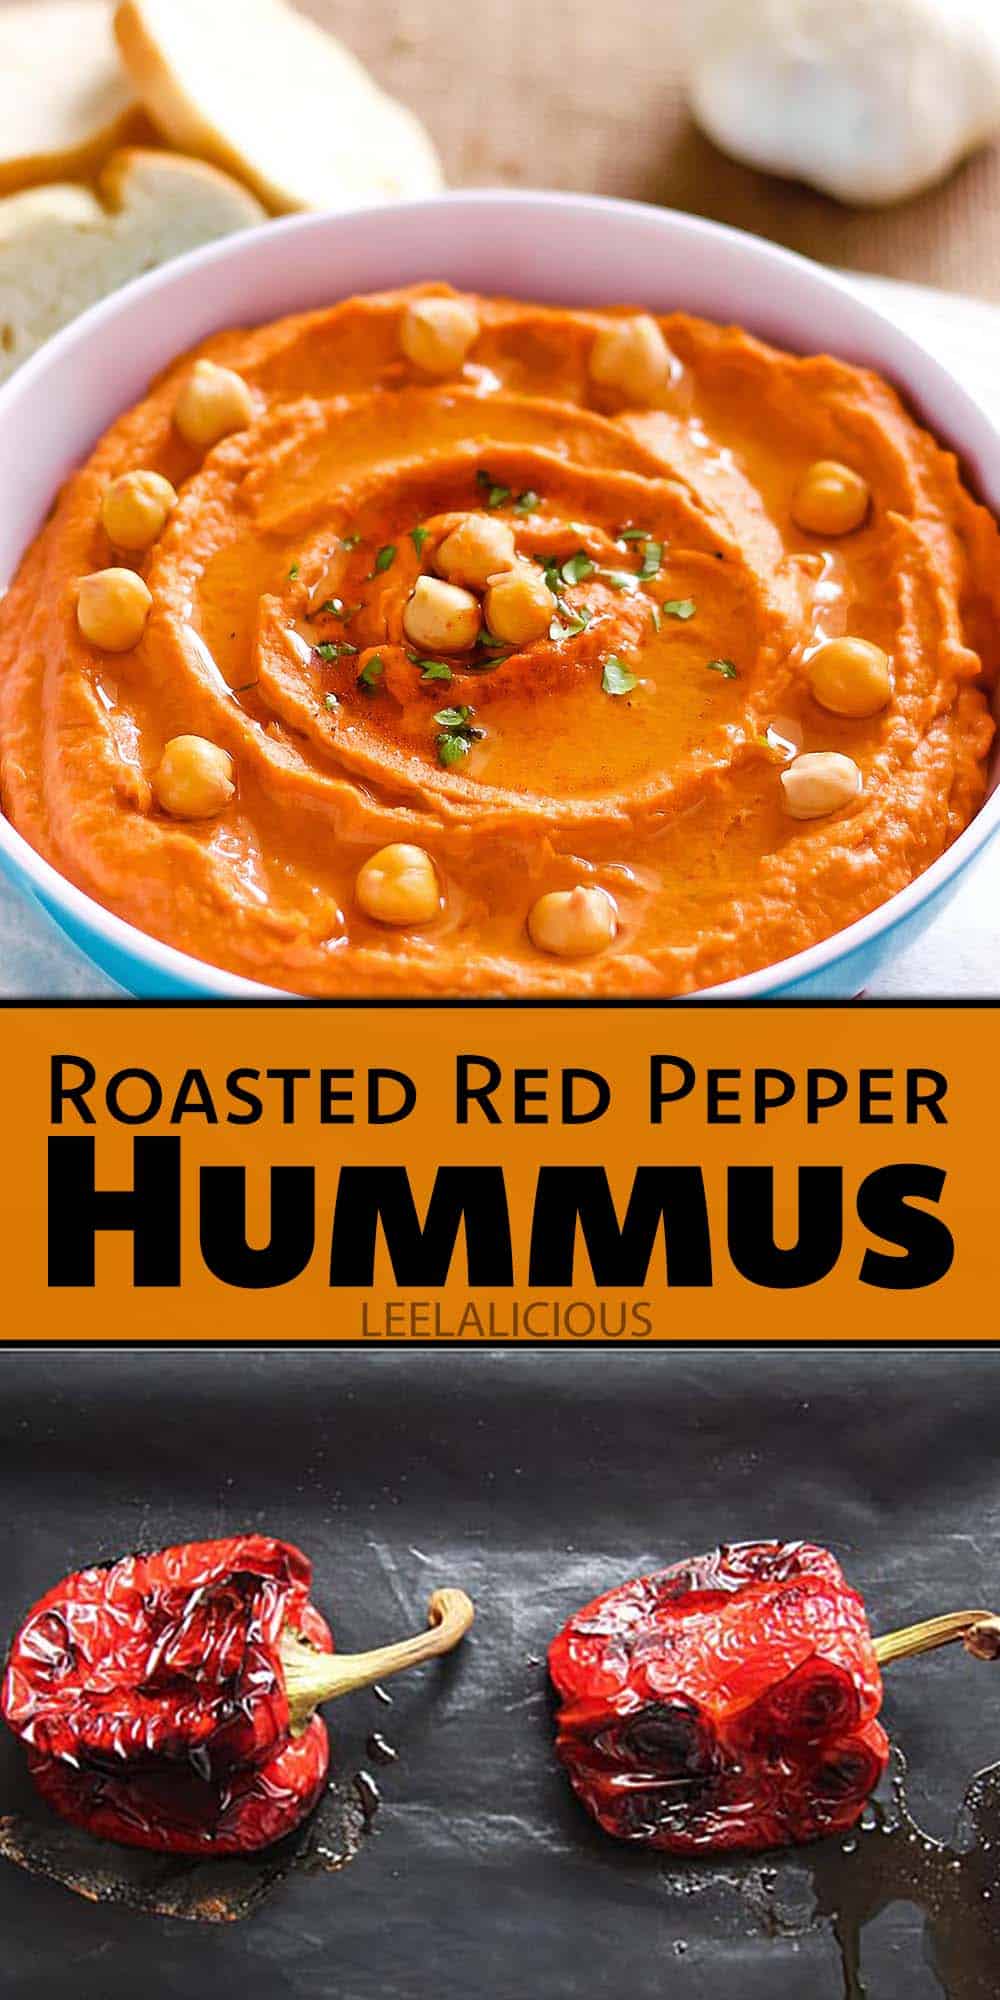
This red pepper hummus recipe is made with roasted red peppers. I love the red-orange colour the peppers lend the hummus. And the flavor… Oh my, the smoky flavor is out of this world! The recipe combines canned chickpeas (otherwise known as garbanzo beans) with roasted red peppers, roasted garlic, tahini paste, fresh lemon juice (or lime juice), olive oil, cumin, salt, pepper, and cayenne pepper into a deliciously creamy mixture perfect for eating with warm pita, pita chips, raw vegetables, or spread on a wrap or sandwich.
Avocado Oil or Olive Oil
For this recipe, you have the choice of using the more traditional olive oil or you can use avocado oil. During a previous Costco run, Konrad and I picked up some Avocado Oil. Neither of us had heard of or tried it before, but we were intrigued by the statement on the bottle that it was "100% pure, naturally refined and high in antioxidants."
We surely weren’t disappointed. It is a great cooking oil suited for high heat. It does not taste like avocado, but rather it has a smooth, buttery taste. I must say: it is a fantastic fit for this hummus, although olive oil works just as well of course.
Fresh Red Peppers or Jarred Peppers
If you don't want to roast your own peppers, you can use store-bought roasted peppers. However, I chose to roast fresh peppers as the tiny jar of roasted peppers that I found in the store here was super expensive. Roasting peppers takes a while, but most of the time is hands-off so you can get a lot of other things done in the meantime. Three cheers for multitasking! If you would like to make this roasted red pepper hummus, here are some instructions for roasting the peppers and garlic, and blending the entire mixture together.
How to Roast the Red Peppers
You can definitely use canned roasted red bell peppers from the store in this recipe. However, sometimes I like to roast them myself – especially if I have bell peppers in the fridge that need to be used up.
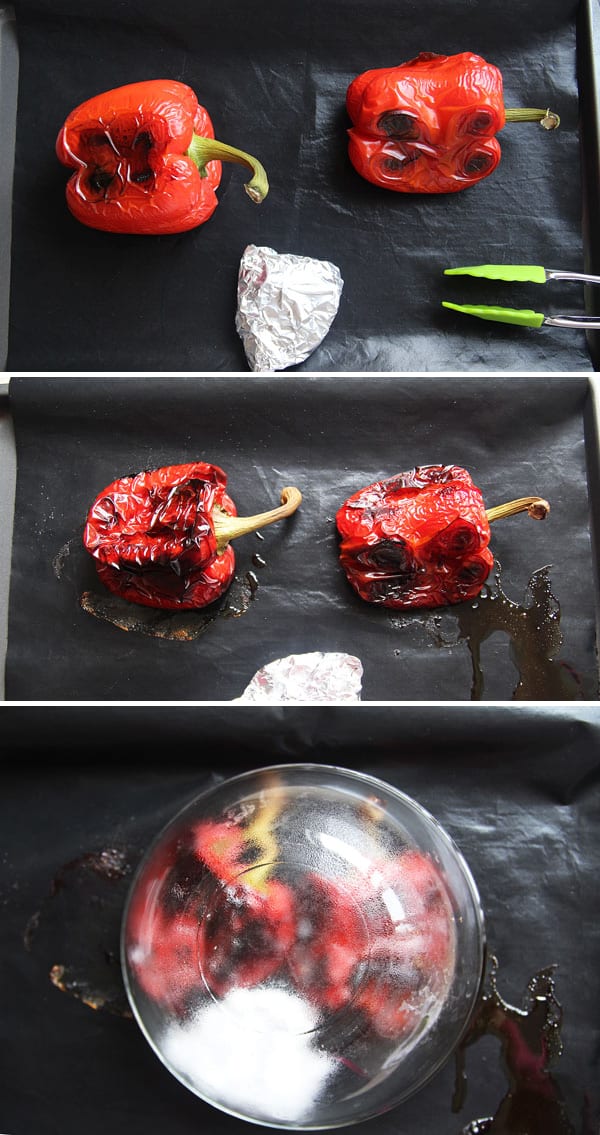
I roasted the bell peppers and garlic at the same time. The oven has to be preheated to 400 degrees Fahrenheit. The washed and dried bell peppers can be placed on a lined baking sheet as they are.
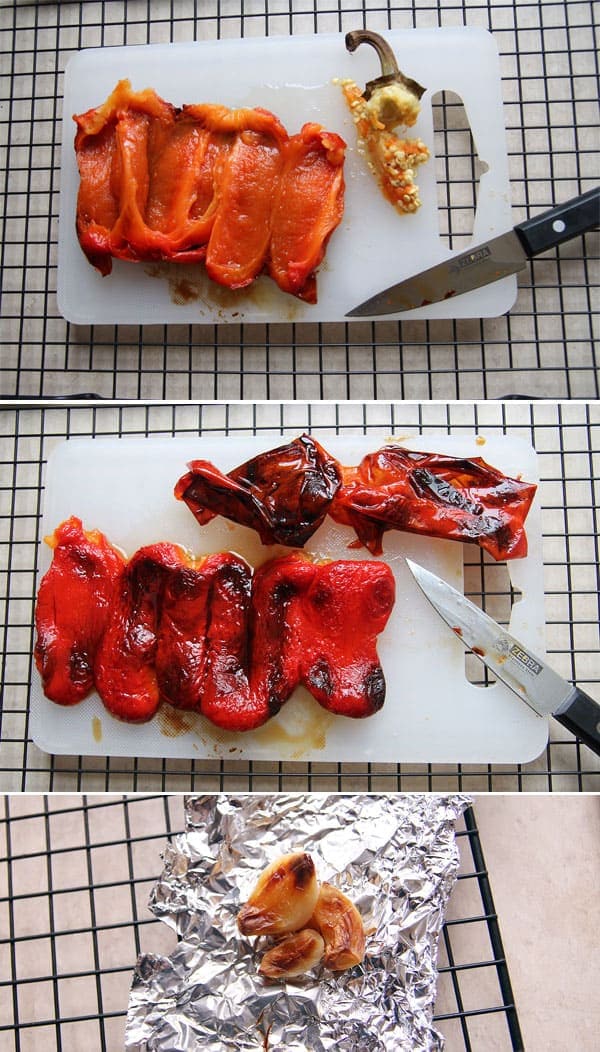
After roasting the peppers, cover the peppers with a bowl and let steam for 15 minutes. This makes removal of the skin easier. Then, you just peel the peppers with your hands and remove the seeds before adding them to the food processor.
How to Roast the Garlic
To roast the garlic, wrap the peeled garlic cloves in aluminum foil and place the pouch on the baking tray as the peppers. While I only roasted the number of garlic cloves I needed for this recipe, you can roast a whole head of garlic or two instead. That way, you will have some on hand if you would like to make this recipe again or if there is another dish where you would like to add the taste of sweet roasted garlic. Just cut off the tops to expose a little of each clove and drizzle with a little oil.
Then, roast the garlic heads for 1 hour while giving the peppers a quarter turn every 15 minutes. Turn the garlic pouch over once after 30 minutes.
Any roasted garlic that doesn’t go in this hummus can be used as a spread on bread or frozen in an ice cube tray for future use in stews, soups, marinades, sauces, and more. It is particularly wonderful blended into softened butter and spread onto bread slices to make homemade garlic bread.
In case you are wondering about the black liners on my baking sheet – my aunt sent me these amazing reusable, non-stick Teflon liners from Germany for our wedding.
How to Achieve Smooth, Creamy Hummus
There are a few ways to make extra smooth and creamy hummus. One method is to remove the skins on the chickpeas and the other method is to cook the chickpeas to a very soft texture.
Removing the Skins
In my previous pumpkin hummus recipe, I showed you how to achieve really smooth hummus by removing the skins on the chickpeas.
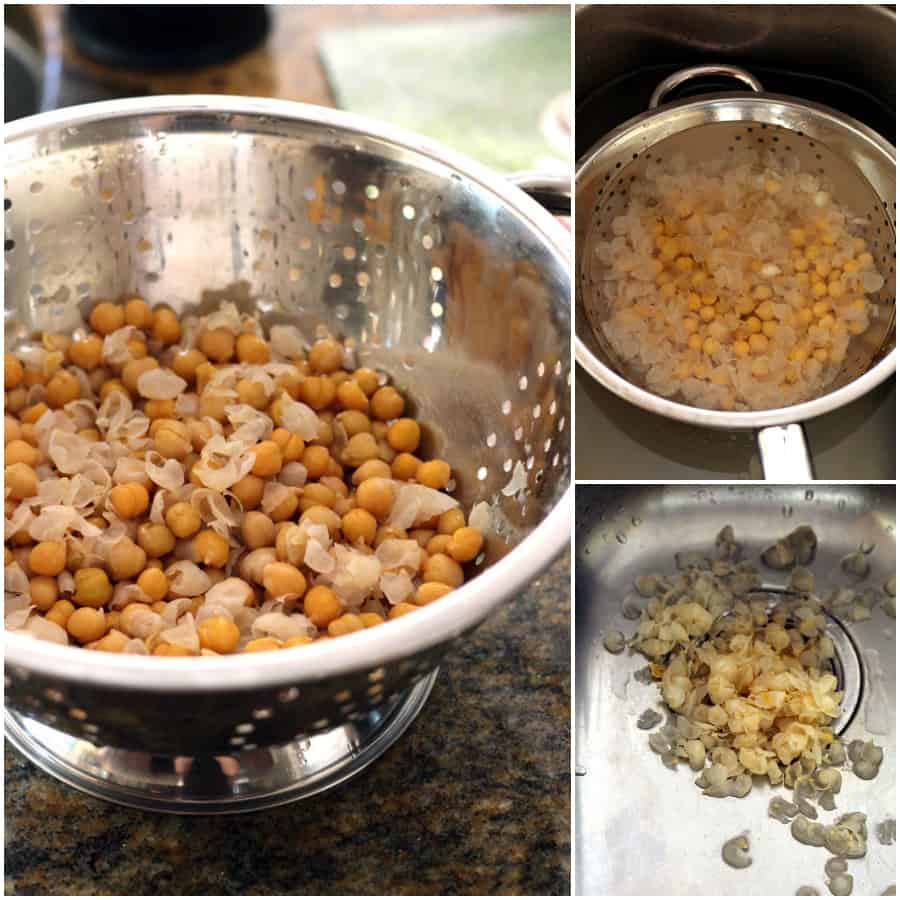
To remove the skins, I empty the can of chickpeas into a colander and rinse them under running water while rubbing the chickpeas together vigorously. This will loosen most of the skins. Then, I immerse the colander in water and skim off the skins that are floating on top. Don’t worry about some skins remaining on the chickpeas.
Cooking the Chickpeas to a Soft Texture
Nowadays, when I cook my chickpeas in the pressure cooker, I don’t remove the skins. I just cook the chickpeas to an extra soft texture, which in turn breaks down into super smooth hummus when processed.
If you are relying on canned chickpeas, you can also cook them down to an even softer texture if you would like to make an extra creamy hummus. Just drain the can and rinse the chickpeas. Add them to a pot with boiling water and cook them for another 15-20 minutes until very soft.
Blending the Hummus
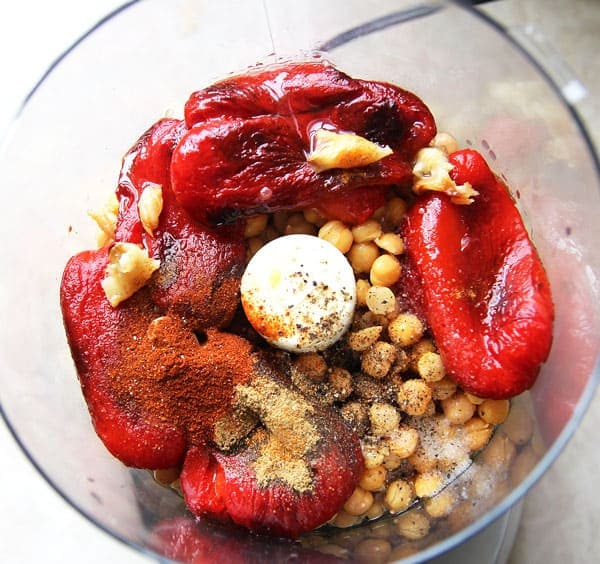
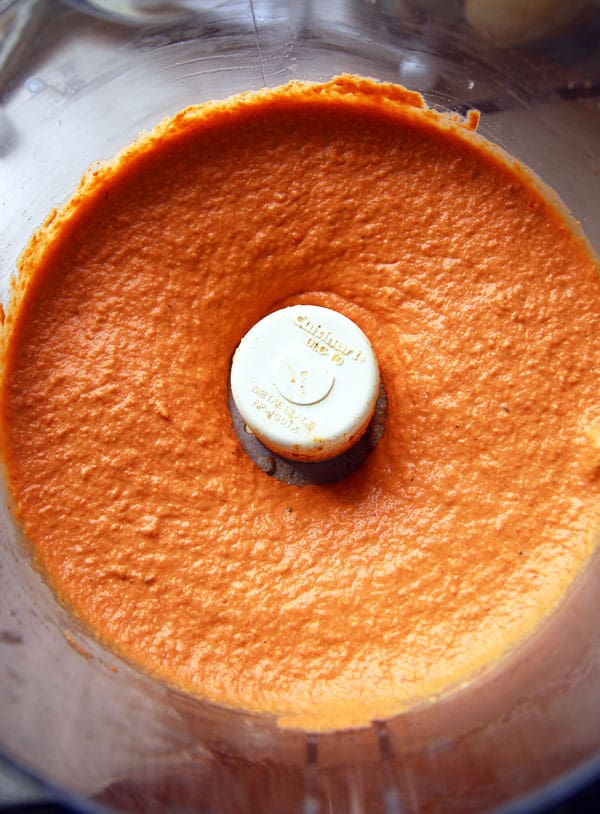
To make the hummus, place the chickpeas, red peppers, garlic, tahini, lemon juice, olive oil, cumin, paprika, salt, pepper, and cayenne in a food processor and process until smooth. However, I like to reserve some whole chickpeas to use as a decorative topping.
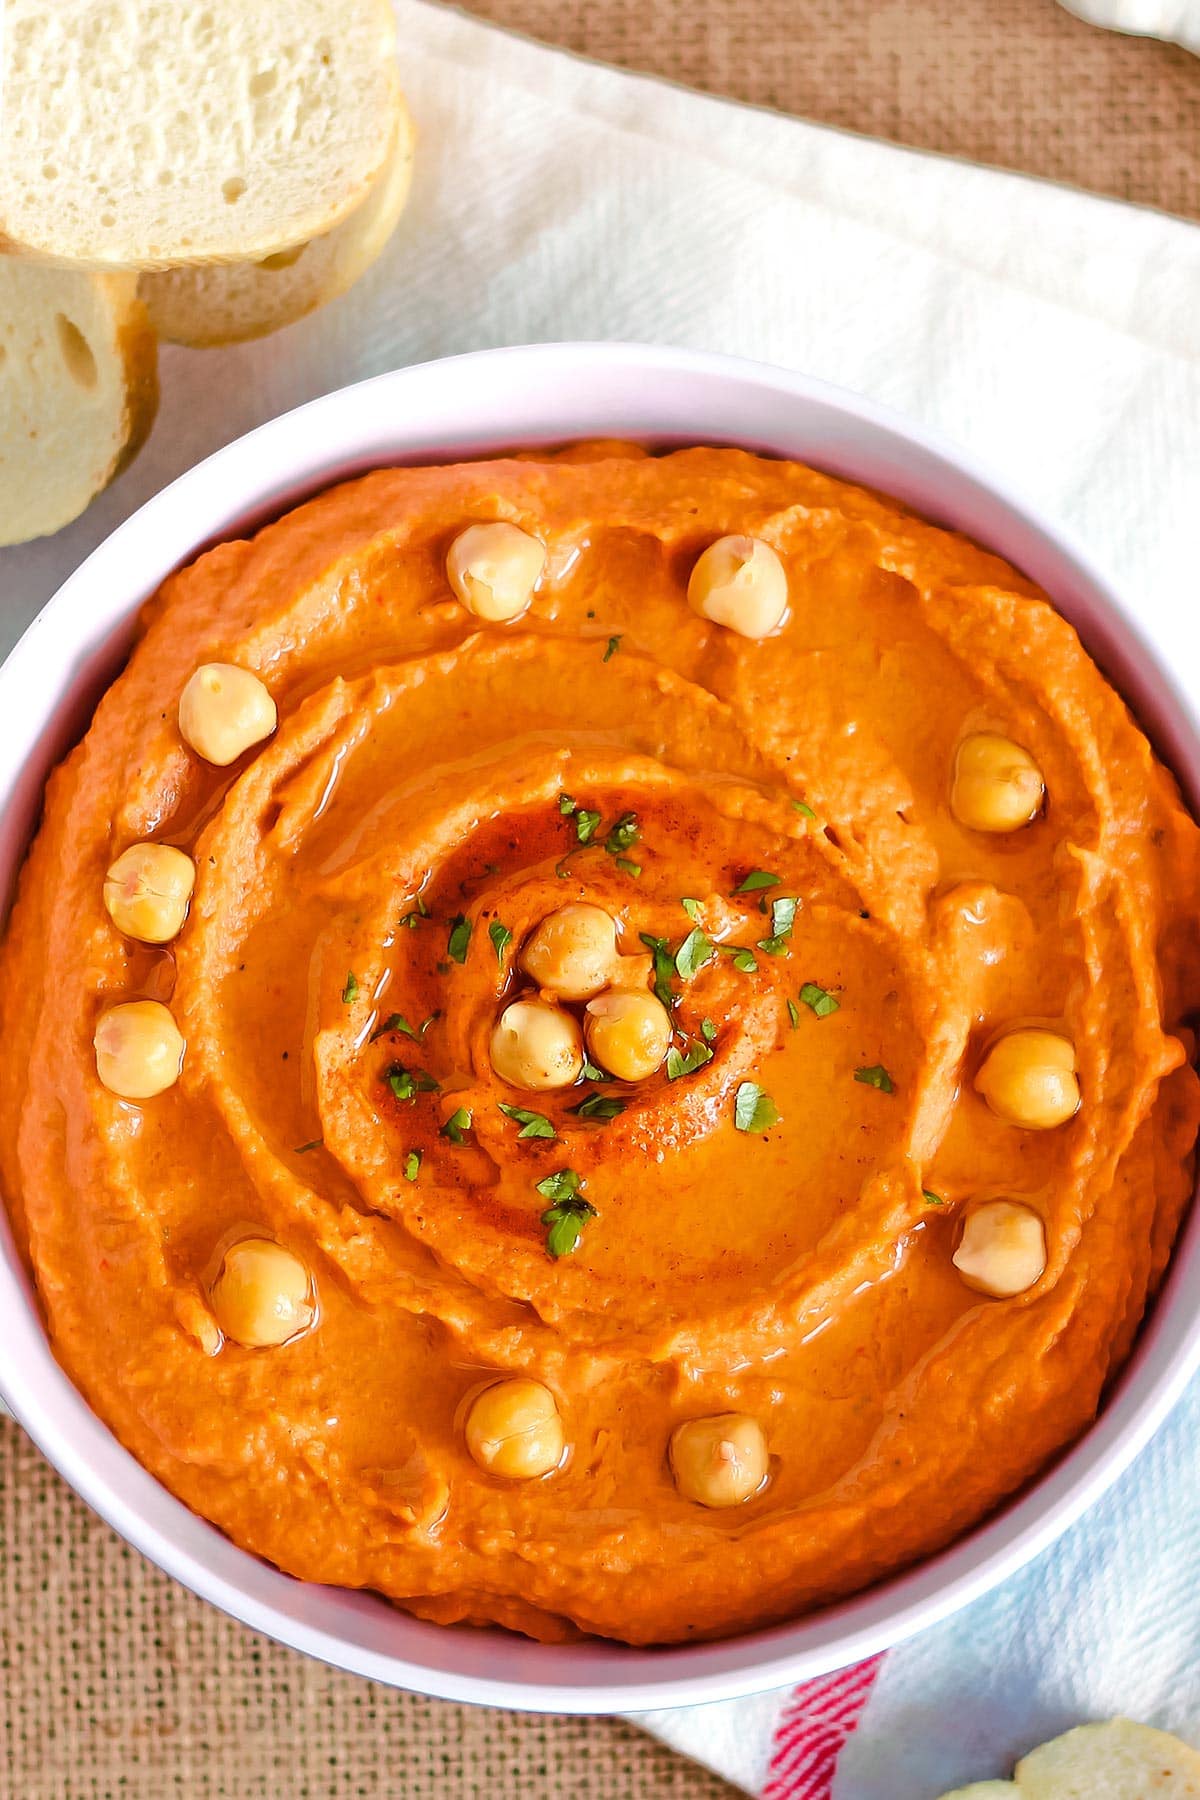
Once the hummus is a nice, smooth consistency, place it in a serving bowl. Then, you can garnish it with paprika, parsley, a drizzle of olive oil, and the reserved chickpeas before serving it with your choice of bread, crackers, vegetables, and more.
Serving the Hummus
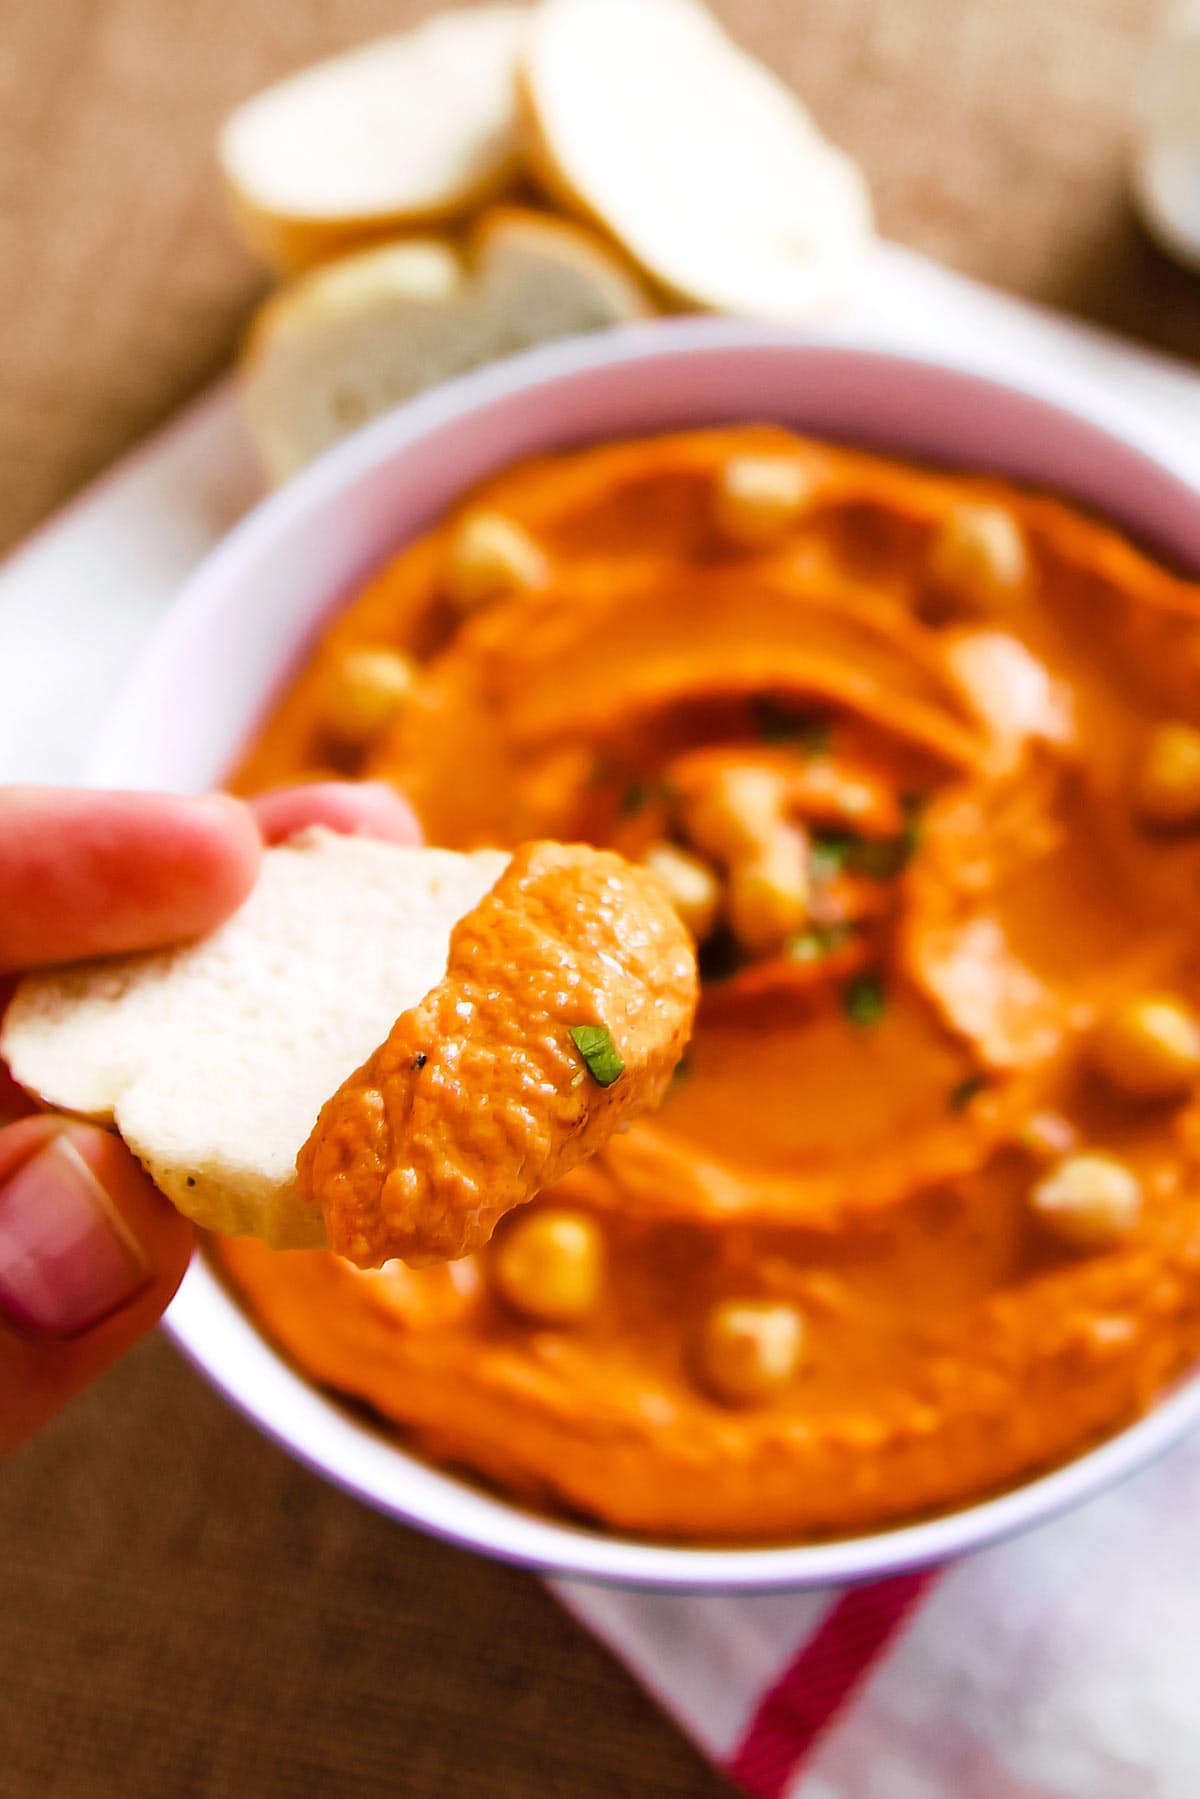
As previously mentioned, this hummus is absolutely perfect to enjoy spread on slices of bread like baguette or warm pita, or as a dip for fresh vegetables like carrot or celery sticks, broccoli florets, cherry tomatoes, sliced peppers, and more. However, you can serve it in other ways as well. Here are some suggestions:
- Make a veggie wrap with your favourite tortillas, fresh spinach, julienne vegetables, and high-quality protein like chicken breast or hardboiled eggs.
- Add as a garnish to a lamb burger with some fresh arugula.
- Spread on slices of cucumber before topping with a kalamata olive half and basil leaf for a healthy hors d'oeuvre.
- Add to your holiday charcuterie tray to add a sauce component to your crackers, meat, and cheese.
- Use as a replacement for salad dressing. In this case, if you would like a looser consistency, simply blend it with a little more oil to thin it out.
Other Recipes You Might Enjoy
Check out these similar recipes!
Roasted Red Pepper Hummus
Ingredients
- 1 can chickpeas 15 oz. can; drained but reserve some chickpea water
- 2 red bell peppers roasted
- 3 cloves garlic roasted (1 clove, if using raw garlic)
- ¼ cup tahini
- 2 tablespoons lemon/lime juice
- 2 tablespoons olive/avocado oil
- ½ teaspoon ground cumin
- ½ teaspoon paprika powder
- ½-1 teaspoon salt
- black & cayenne pepper to taste
Instructions
- To roast the bell peppers preheat the oven to 400 degrees F. Place washed bell peppers on a lined baking sheet. Wrap garlic cloves in aluminum foil and place on baking tray as well. Roast for 1 hour while giving the peppers a quarter turn every 15 minutes. Turn the garlic pouch over once after 30 minutes.
- Cover the roasted bell peppers with a bowl and let steam for 15 minutes. This makes removal of the skin easier. Pull out the stem and seeds. Open the pepper from one side and remove any remaining seeds from the inside. Turn pepper over and pull off the thin, hard skin.
- Drain the chickpeas but reserve some of the liquid. Place chickpeas in a colander. Rinse and rub chick peas vigorously to loosen most of the skins. Immerse in water and skim off the floating skins. Removing the skins makes smoother hummus, but is optional.
- Place skinned chick peas in a food processor (reserve a few as topping) together with all other ingredients. Process until smooth. Scrape down sides as necessary. If the mixture seems too dry add a little of the reserved chickpea liquid, 1 tablespoon at a time.
- Transfer roasted red pepper hummus to a bowl and drizzle with a little more olive/avocado oil. Sprinkle with a little paprika powder and place a few whole chickpeas on for decoration. Store covered in the fridge.
Nutrition
Pin this Roasted Red Pepper Hummus recipe for later?
Random Questions
Red pepper hummus can be a nutritious and healthy option. It is typically made with ingredients like roasted red peppers, chickpeas, tahini, olive oil, and various spices. These ingredients offer a range of nutrients, including fiber, protein, vitamins, and healthy fats. However, it's essential to be mindful of portion sizes and the overall balance of your diet.
Roasted red pepper hummus is a flavorful variation of traditional hummus that incorporates roasted red peppers into the classic chickpea and tahini base. The roasted red peppers add a smoky sweetness and a vibrant red-orange color to the hummus. It's a popular dip or spread that can be enjoyed with pita bread, chips, or fresh vegetables.
While specific recipes may vary, Cava red pepper hummus typically includes roasted red peppers, chickpeas, tahini, olive oil, garlic, lemon juice, and various spices. These ingredients are blended together to create a smooth and creamy texture with a rich and smoky flavor from the roasted red peppers.
The ingredients in Publix roasted red pepper hummus may include roasted red peppers, chickpeas, tahini, olive oil, garlic, lemon juice, and a blend of spices. These components come together to create a flavorful and creamy hummus that is often enjoyed as a dip or spread with various accompaniments such as pita bread or fresh vegetables.
Rachel Davis
I am a hommus fanatic and cannot wait to try this! I was wondering how long you link it would last in the fridge? 🙂
Regina
We usually finish it within a few days, but I'd think it would last 5-7 days in the fridge. Let me know how you like this version 🙂
Anna @ happycookinghealthyliving.com
I really like this! looking forward to trying it out! thanks 🙂
Regina
Hope you do Anna 🙂 Let me know how you like it!
Jacquee @ I Sugar Coat It!
OK, looks like we won't be buying another tub of roasted red pepper hummus - I'll get K to make this from now on! We enjoy snacking on hummus with veggies and crackers. YUM!
Regina
I looked at the price of roasted red pepper hummus in stores. Made me realize this was worth the effort!
Liz
Can't wait to try this recipe. I love hummus and with the added roasted red pepper.....delicious! 🙂
Regina
I hope you do Liz. Anyone who likes hummus will love this roasted red pepper version!